The Spring framework provides developers with a powerful and flexible transaction management mechanism. Whether it’s a complex distributed system or a simple monolithic application, Spring’s transaction abstraction layer allows us to control transaction behavior in a unified and concise way. This article will start with why to use Spring transactions, and then deeply explore its core configuration, working principles, key attributes, and common pitfalls and best practices.
Part I: Why Choose Spring’s Transaction Model?
In traditional JDBC operations, we need to manually handle the acquisition, commit (commit), and rollback (rollback) of Connection objects, which is tedious and error-prone. Although JTA (Java Transaction API) provides the capability for cross-resource transactions, its API is relatively complex.
Spring elegantly solves these problems. By providing a consistent programming model, it allows developers to manage transactions in the same way, whether in a simple JDBC environment or a complex JTA environment. This greatly reduces learning costs and code coupling.
The Spring framework provides two core transaction management approaches:
- Programmatic Transaction Management: Manually control transactions in code through
TransactionTemplateor directly using thePlatformTransactionManagerAPI. This approach is more flexible but intrusive. - Declarative Transaction Management: Based on AOP (Aspect-Oriented Programming), use the
@Transactionalannotation to manage transactions. This is currently the most popular and Spring’s officially recommended approach, as it completely decouples business code from transaction management code, maintaining the purity of POJOs.
Part II: Core Configuration: Behind the Scenes of TransactionManager
For declarative transactions to take effect, a PlatformTransactionManager Bean must be correctly configured in the Spring container. This manager is the core of Spring’s transaction infrastructure, responsible for executing transaction creation, commit, and rollback.
For JDBC-based applications, we typically use DataSourceTransactionManager. The following is a typical Java-based configuration:
@Configuration
@EnableTransactionManagement // Enable declarative transaction management
@PropertySource("classpath:jdbc.properties")
public class DataSourceConfig {

    @Value("${jdbc.driverClassName}")
    private String driverClassName;

    @Value("${jdbc.url}")
    private String url;

    @Value("${jdbc.username}")
    private String username;

    @Value("${jdbc.password}")
    private String password;

    /**
     * Configure data source
     */
    @Bean(destroyMethod = "close")
    public DataSource dataSource() {
        BasicDataSource dataSource = new BasicDataSource();
        dataSource.setDriverClassName(driverClassName);
        dataSource.setUrl(url);
        dataSource.setUsername(username);
        dataSource.setPassword(password);
        return dataSource;
    }

    /**
     * Configure transaction manager and inject data source
     */
    @Bean
    public PlatformTransactionManager txManager(DataSource dataSource) {
        return new DataSourceTransactionManager(dataSource);
    }
}
The @EnableTransactionManagement annotation is the key to activating declarative transaction processing capabilities. Once configured, we can use the @Transactional annotation in our code.
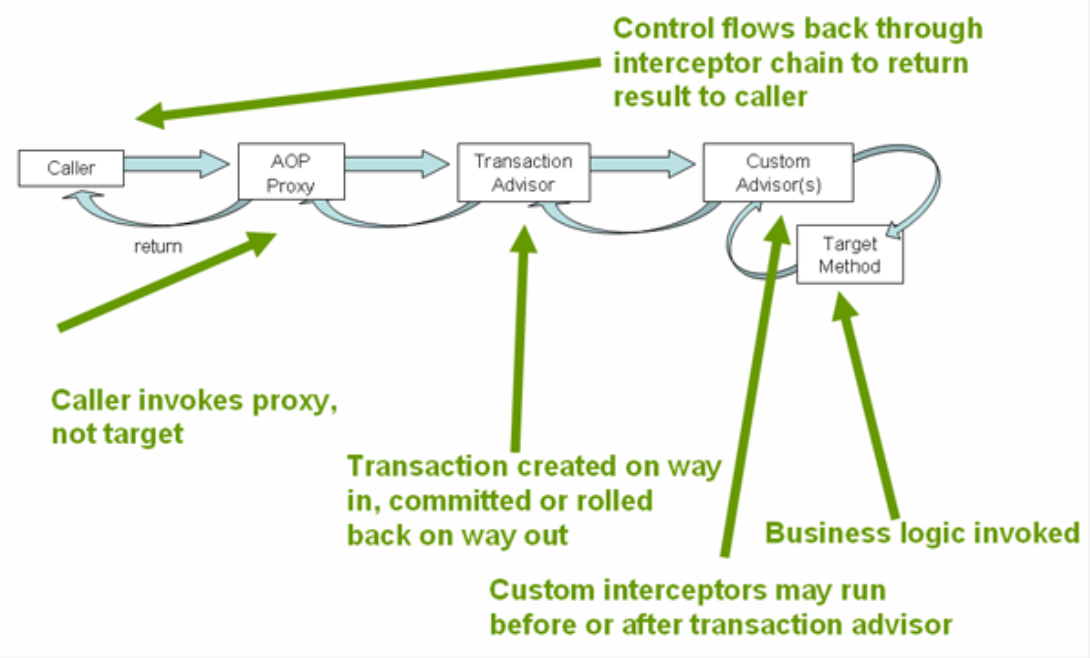
Part III: The Magic of @Transactional: AOP Proxy Mechanism
You might wonder how a simple @Transactional annotation can automatically start and close transactions. The answer is AOP (Aspect-Oriented Programming).
When the Spring container detects that a method of a Bean is annotated with @Transactional, it does not directly return an instance of that Bean, but instead creates a Proxy of that Bean. All subsequent calls to methods of that Bean will first be intercepted by this proxy object.
This proxy object internally contains a TransactionInterceptor, which starts a transaction before the target method executes, commits the transaction after the method successfully executes, and rolls back the transaction if the method throws an exception.
This process can be represented by the following diagram:
Part IV: Deep Dive into Core Attributes of @Transactional
The @Transactional annotation provides rich attributes that allow us to finely control transaction behavior.
1. Rollback Rules (rollbackFor & noRollbackFor)
A common misconception is that @Transactional will roll back transactions when any exception occurs.
Spring’s default rollback rules are:
- When a method throws
RuntimeExceptionor its subclasses, the transaction rolls back. - When a method throws
Error, the transaction rolls back. - When a method throws a checked exception (Checked Exception, i.e., non-
RuntimeException), the transaction does not roll back.
This default behavior is unsafe in many scenarios (for example, SQLException and IOException are both checked exceptions). Therefore, in enterprise projects, we usually explicitly specify rollback rules to make all exceptions trigger rollback.
// Recommended: Make all Exception and its subclasses trigger rollback
@Transactional(rollbackFor = Exception.class)
public void someBusinessMethod() throws IOException {
    // ...
}
2. Transaction Propagation Behavior (propagation)
Transaction propagation behavior defines how a transaction should behave when a method with an existing transaction calls another method with a transaction. This is a very powerful and important feature in Spring transaction management.
The most commonly used propagation behaviors include:
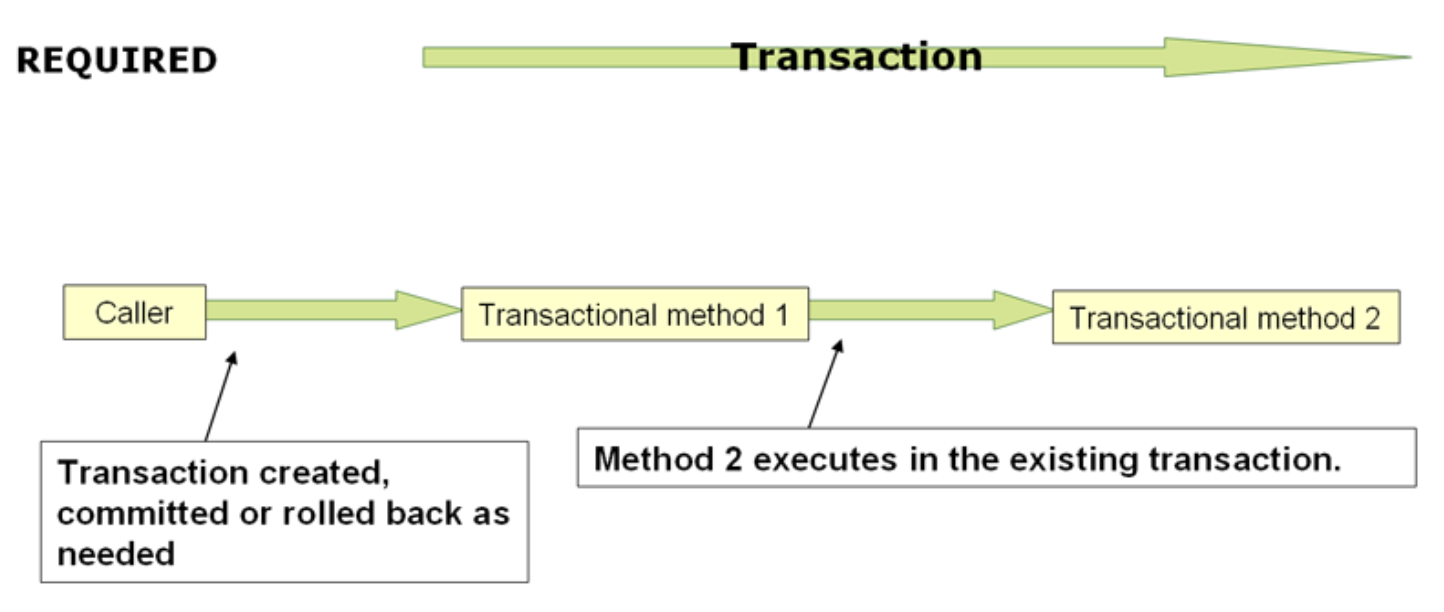
REQUIRED(default): If a transaction currently exists, join that transaction; if no transaction currently exists, create a new transaction. This is the most common choice.REQUIRES_NEW: Always create a new transaction. If a transaction currently exists, suspend the current transaction.SUPPORTS: If a transaction currently exists, join that transaction; if no transaction currently exists, continue running in a non-transactional manner.NOT_SUPPORTED: Run in a non-transactional manner. If a transaction currently exists, suspend the current transaction.MANDATORY: If a transaction currently exists, join that transaction; if no transaction currently exists, throw an exception.NEVER: Run in a non-transactional manner. If a transaction currently exists, throw an exception.NESTED: If a transaction currently exists, create a nested transaction (savepoint); if no transaction currently exists, the behavior is equivalent toREQUIRED.
3. Isolation Level (isolation)
Transaction isolation level defines the extent to which a transaction may be affected by other concurrent transactions. Inappropriate isolation levels can lead to dirty reads, non-repeatable reads, and phantom reads.
@Transactional supports the following isolation levels:
READ_UNCOMMITTED: Allows reading uncommitted data changes, which may lead to dirty reads, non-repeatable reads, and phantom reads.READ_COMMITTED: Only allows reading committed data, which can prevent dirty reads. This is the default isolation level for most databases (such as Oracle, PostgreSQL).REPEATABLE_READ: Ensures that when reading the same data multiple times within the same transaction, the results are consistent, which can prevent dirty reads and non-repeatable reads. However, phantom reads may still occur. This is MySQL’s default isolation level.SERIALIZABLE: The highest isolation level, completely preventing concurrency issues, but with the greatest performance overhead.
Part V: Common Pitfalls and Best Practices
1. Methods Annotated with @Transactional Must Be public
Spring’s AOP proxy only intercepts public methods by default. If @Transactional is used on protected, private, or package-visible methods, transactions will not take effect.
2. “Self-Invocation” Failure Problem
This is one of the most common and hidden pitfalls. When method A in a class calls method B in the same class (this.B()), even if method B is annotated with @Transactional, the transaction will not take effect.
Reason: When method A calls this.B(), it is called directly through the original object reference this, bypassing the AOP proxy object created by Spring. Since it doesn’t go through the proxy, the transaction interceptor naturally cannot work.
3. Recommended to Apply Annotations on Concrete Classes
The Spring team recommends applying the @Transactional annotation on concrete implementation classes and their methods, rather than on interfaces. Although annotations on interfaces can work, class-based annotations are clearer and more direct.
Summary
Spring’s declarative transaction management is a powerful and elegant tool. By deeply understanding the AOP principles behind it, skillfully using core attributes such as rollback rules, propagation behavior, and isolation levels, and being vigilant about common pitfalls like self-invocation failures, we can build robust and maintainable data access layers in our projects.